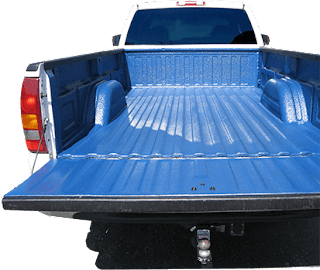

The bed of your vehicle is the most valuable part of the entire truck. You can dump anything there. It is meant to be for rough use. As you use it in the best possible manner, you must take care of it in the same manner. There are many ways available in the market to protect the bed. Some of the well-known companies use thick rubber material to save the surface from the damage, and some provide a drop-in or spray-in bed liners.
Regularly check out your radiator’s performance.Run your car, and then turn it off and pop your hood. You should never open up the radiator of a car is still running. Check the radiator fluid by using a dipstick and remember to always mix the coolant with water prior to adding it.
<DIV style=’float: left; width: 150px; padding: 5px 5px 5px 5px;’><DIV style=’background-color: #FFFFCC; color: #000000;’><small><font color=’#FF0000′><b>TIP!</b></font> Make sure that you do not neglect the radiator. Let the car run a couple minutes, shut off the engine and then pop the hood.</small></DIV></DIV>
Nowadays, there is a durable, reliable and economical option to protect the bed liner – The Paint. Here in this article, you will get the information regarding the cost, as well as the advantages and disadvantages of the bed liner paint job. You will also get the easy step-by-step guide to applying the material all by yourself! Read further to know more!
Cost of a bedliner
You don’t have to call a mechanic when your car is giving your problems. Some jobs are easy to do not need to be taken to the auto shop. If it is not a very difficult job, you can usually do it yourself.
<DIV style=’float: right; width: 150px; padding: 5px 5px 5px 5px;’><DIV style=’background-color: #FFFFCC; color: #000000;’><small><font color=’#FF0000′><b>TIP!</b></font> You do not have to contact a mechanic when your car is having problems. Some car repairs are simple and do not need to be taken to the auto shop.</small></DIV></DIV>
As per the professionals, a bedliner can range between $100 to $800 or a maximum $1000. If you want to do the paint job for the bed liner, then it starts from $80 to $100 onwards, and if you’re going to go for some professional bed liner spray, it may go up t0 $800 to $1000.
Bed liner paint job is not too difficult. You can complete a paint job if you wish to do it on your own. One person can complete it within a few hours. DIY bed liner paint job is economically best for the owner of the truck; however, you do risk quality by not going to a professional.
You need your car’s records in a handy location. You want these with you when you go to get repairs done; a great place to store them in the glove compartment. The people repairing your automobile are going to need to go through these records. This will allow them assess the issues are quickly.
DIY Bed Liner Paint Job
Step 1: First of all, decide the right brand of paint for you and then start to your vehicle aggressively. The right angle is preferable for the spinning sander.
Keep a record of all the repairs you make on your car is fixed or maintained. If you have more problems later, it may help the mechanic to see these notes.
Step 2: Clean the surface of sanded paint with your compressor blower. Make sure you clean it well for the better output, clean all the debris and other particles.
Step 3: Remove all the badges of the vehicle so that you can prevent painting over them.
Look for online reviews of local auto shops. This can tell you of how satisfied customers are with their work. This information can play a shop that makes you eventually choose to do your car repair work.
Step 4: After removing all the badges, do some more sanding on and around the areas you want to paint.
Step 5: Now it is the time to rag and clean the surface so that you can wash the truck efficiently.
If you’re headlights are giving off dull light, you may want to check their cleanliness. Use a quality glass cleaner to wash any dirt away from them.
<DIV style=’float: left; width: 150px; padding: 5px 5px 5px 5px;’><DIV style=’background-color: #FFFFCC; color: #000000;’><small><font color=’#FF0000′><b>TIP!</b></font> If you think your headlines are not as bright as usual, check them to see if they are clean. Clean theses with a glass cleaning agent to get them as clean as possible.</small></DIV></DIV>
Step 6: After completing the process of sanding, stick some tapes to every part of your car which you don’t want to paint over! There are some areas like car locks, handles, side mirrors, badges, etc. which should not be painted. You can use newspapers and tape to cover these areas.
Step 7: Now, decide the liner color and the texture you want. Take it and open. Kindly do not forget to stir it thoroughly well. If you don’t want to go out at some stores to buy such instruments, you can also use drill and blender elements to stir the color well.
Always try to figure out the problem with your car’s problems yourself before trying to get it repaired. You probably know that some mechanics will deceive you about your car repairs to charge more money.
<DIV style=’float: right; width: 150px; padding: 5px 5px 5px 5px;’><DIV style=’background-color: #FFFFCC; color: #000000;’><small><font color=’#FF0000′><b>TIP!</b></font> Always try to figure out the problem with your car’s problems yourself before you bring it in for repairs.You probably already know that certain mechanics sometime engage in dishonesty if they think they can make a larger profit.</small></DIV></DIV>
Step 8: After mixing the color, now it’s time to pour paint into a container. It is optional but preferable as pouring the paint into the bottle will help you to dip and use the roll brush quickly. You can also use wide oil brushes.
Step 9: Do the first coat. Make sure that you paint in one direction to give a better texture to your truck bed. After the first layer, wait for an hour and then apply the second coat. Be careful not to drip.
Assemble a DIY auto repair tool kit and put it inside of your trunk. Your tool kit should have equipment needed for changing a tire and other necessary items. A lug wrench and jack are essential. You should have a few screwdrivers with various shapes as well as different wrenches like for this kit.
<DIV style=’float: left; width: 150px; padding: 5px 5px 5px 5px;’><DIV style=’background-color: #FFFFCC; color: #000000;’><small><font color=’#FF0000′><b>TIP!</b></font> Keep a repair kit for doing auto repairs in the car at all times. Your tool kit should have equipment needed for changing a tire and other necessary items.</small></DIV></DIV>
Step 10: At last, after 24 hours, remove all the tape and newspaper from the vehicle then stick all the removed badges. Your DIY bed liner paint job has been done!
Pros and cons of the bed liner paint job
Pay attention to your car’s wiper blades. You may need new blades if they are making noises and leaving streaks on the glass.
Pros
Paint is cheap and budgets friendly as compared to others.
If your car has been having a small problem that you think is minor, you should take your car in to check it out anyway. A small problem can become a big one if don’t pay attention to it.
You can get many color options and can apply them creatively.
It is durable and indestructible. It also looks great.
Don’t try to diagnose and figure out what is wrong with your car by yourself. What may seem to be a simple task can be very complex, particularly in modern cars. Let the diagnosing. Tell them everything you can about the issue, and then let them do their job.
It is easy to clean as there will be at least two coats on your bedliner.
Cons
Bleed your brakes before you take your work is done on them. Test for leaks to ensure that no fluid coming out. You can then ready to test drive your car on roads that don’t have a lot of traffic. Drive slowly at first to make sure that you can ensure your repairs have been performed correctly.
As you are not a professional applicator, it might not be implemented well.
If you do not have a garage or any closed places, you may suffer from some bug clinging to the wet paint coat.
A lot of auto repair is consistency. Stick with a trusted mechanic whom you have used before instead of going around to various ones for repairs. Different mechanics might tell you a different diagnosis of your vehicle. They could charge different amounts that cause you more for the work done.
You have to give 24 hours to let the truck dry. So, it is quite time-consuming.
You may miss some hard to reach areas, or sometimes you may paint on the badges, windows, or side reflectors.
It may be pricey to use the dealer’s mechanic, but can often be the best choice. The dealer are specialists concerning your model of vehicle. They have rapid diagnostic tools and are trained to quickly diagnose problems with your specific vehicle. They usually attend training programs they take part in regularly.
So, that’s all for this one!
We hope you found this article informative and got all the confusion sorted. Gather as much knowledge as you can, regarding all types of bedliners and choose the best one for your truck.